Built for measurement, not “optimization” hype
The program exposes how the card behaves when it is fully busy. It will not fix defects in hardware or raise in-game frame rates by itself.
Drive the GPU with a sustained, high-demand 3D workload so you can judge stability under load, how heat builds and levels off, and timed benchmark results. Typical uses include verifying cooler upgrades, probing overclock or undervolt margins, and contrasting OpenGL against Vulkan while sensors stay in view the whole time.
The program exposes how the card behaves when it is fully busy. It will not fix defects in hardware or raise in-game frame rates by itself.
Loads can become very hot very quickly. Watch temperature curves and halt the run if readings or behavior suggest risk.
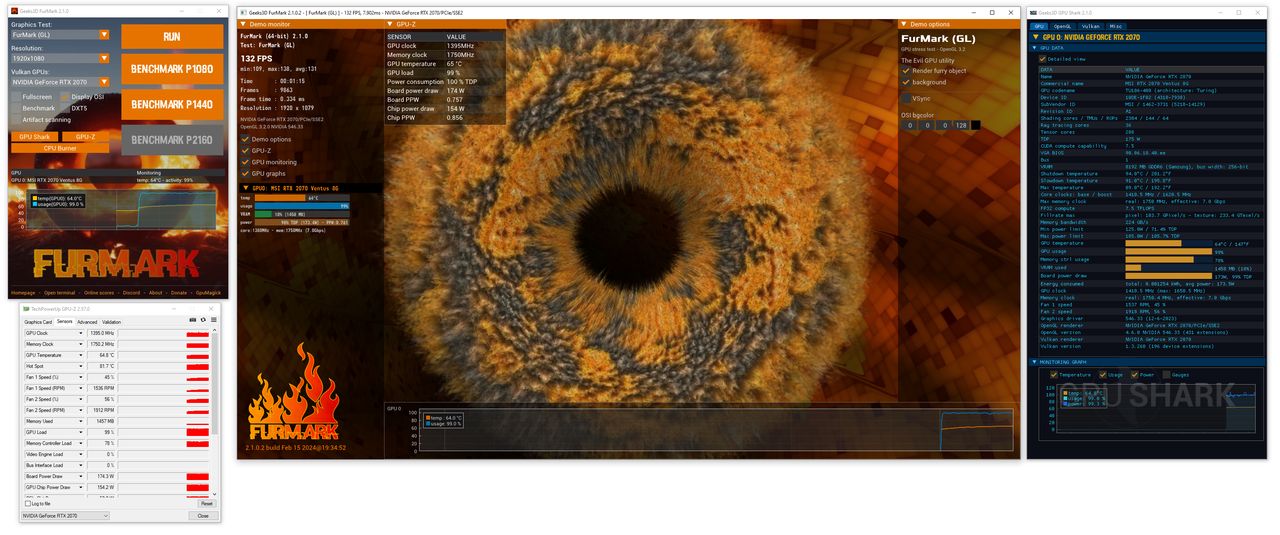
FurMark is a dedicated GPU stress-testing and benchmarking program that drives the graphics processor with a sustained, demanding 3D workload. That intensity helps you study warm-up curves, judge whether cooling keeps pace, and confirm the platform stays stable when the GPU is fully engaged.
Hobbyists, competitive players, overclockers, system integrators, and reviewers rely on it to contrast setups—for example after fan-curve edits, paste or pad swaps, undervolts, or driver upgrades. It is strictly a measurement utility; it is not an FPS booster and not a repair tool for failing silicon.
Track ramp-up speed, plateau behavior, and how fans or liquid loops react once the shader engines stay busy.
Surface marginal clock or voltage tweaks through sparkles, TDRs, black screens, or other abrupt failure modes.
Use clocked runs to contrast tuning iterations when resolution, AA, API, and room temperature stay aligned.
Exercise separate driver stacks where supported to isolate API-specific quirks, regressions, or performance shifts.
Important: FurMark can push hardware to its thermal envelope quickly. Stay present for the run, keep temperature readouts in sight, and treat each session as a deliberate diagnostic—not a stunt. The Guides and Trust & Security sections outline safe procedures and file-integrity habits.
Explore the full breakdown on the Features page, with practical “why it matters” context.
Create sustained load to reveal thermal and stability limits in a controlled environment.
Learn about stress testingTimed runs support before/after comparisons when settings and conditions are consistent.
Benchmark detailsValidate different rendering paths and troubleshoot driver or API-specific issues.
API mode overviewTemperatures, clocks, and usage visibility help you interpret the results safely.
See safe-use guidanceResolution, fullscreen/windowed, AA and other settings allow controlled escalation.
Configuration optionsCombine short tests, gradual intensity increases, and monitoring to validate changes.
Best practices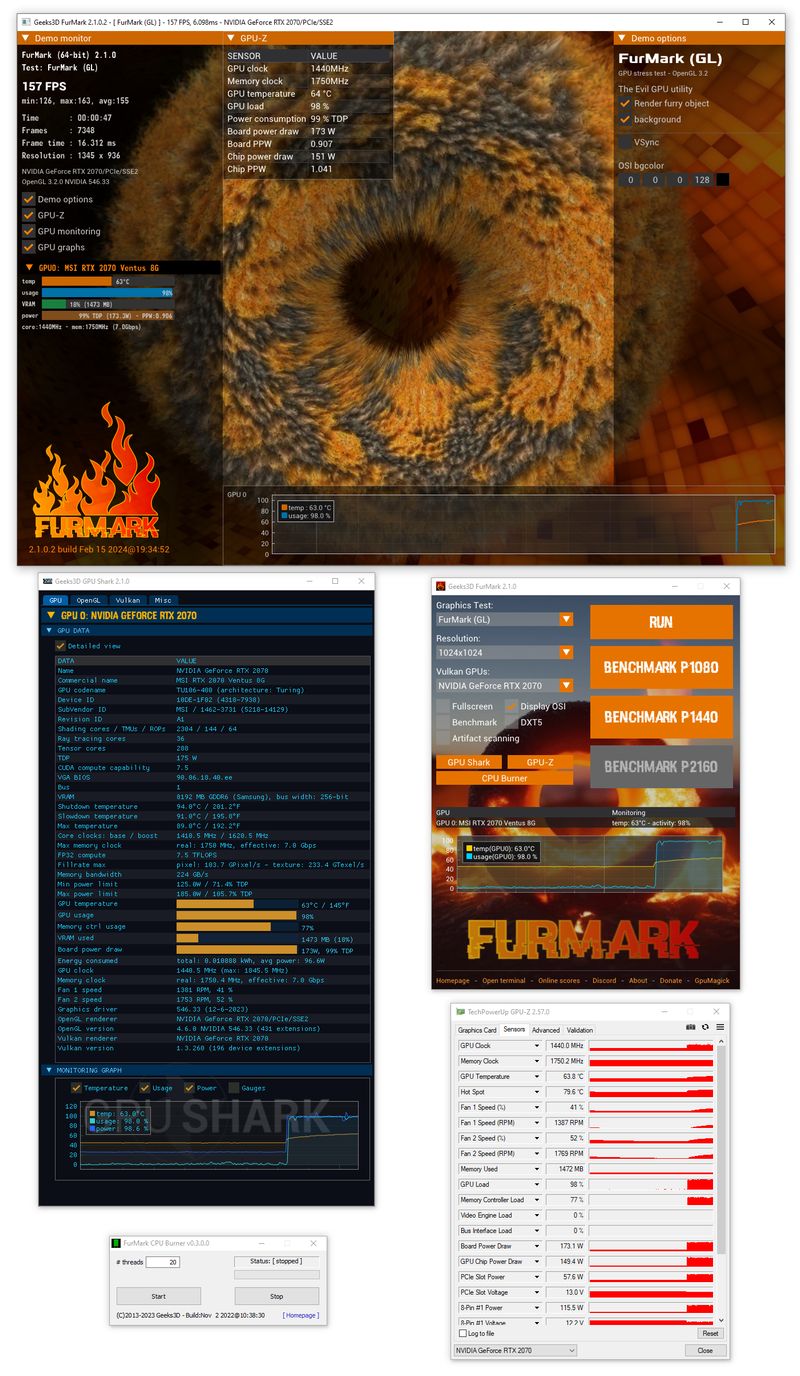
The most valuable results come from repeatable runs and sensible escalation. Start with moderate settings, watch the heat-up curve, and increase intensity step-by-step. If your goal is stability validation, prioritize consistency and sensor visibility over maximum stress.
Quick links
Notice
FurMark is intentionally intense. If you’re new to stress testing, follow the step-by-step guidance in Guides before running long sessions.
Specific, credible scenarios where a GPU stress test and benchmark workflow is useful.
After adjusting clocks/voltage, run short sessions while monitoring temperature and stability. If you see artifacts, a driver reset, or the system becomes unstable, dial back settings and retest.
Useful when a system “seems fine” in games but crashes randomly—FurMark can expose a borderline configuration under a consistent load.
After building a PC or changing case fans, run a controlled stress test to observe how quickly temperatures rise and whether they stabilize. Compare fan curves and airflow changes using identical settings.
Ideal for verifying that a new cooler, repaste, or case layout actually improves sustained thermals—not just idle.
Use benchmark mode to compare before/after driver changes, power limits, fan curves, or memory tuning. Keep ambient temperature, resolution, AA, and API mode consistent for meaningful comparisons.
FurMark is known for generating heavy thermal load—useful for measuring cooling behavior under demanding conditions.
If the system freezes, reboots, or shows artifacts under load, FurMark can help reproduce the issue in a repeatable way while you watch sensors. This supports faster troubleshooting: drivers, power limits, thermals, or unstable tuning.
If temperatures rise too quickly, reduce settings, improve cooling, and stop tests that appear unsafe.
Different tools exist for different goals. This comparison is educational—choose the right tool for the job.
Extreme thermal stress and stability validation under a heavy rendering workload, plus benchmark runs for comparisons.
Broader synthetic graphics benchmarks and scenario-based tests; useful for comparing systems across standardized workloads.
GPU information and sensor visibility. Great for monitoring—less about creating sustained stress by itself.
Tuning and monitoring tool. Useful alongside stress tests, but not a dedicated benchmark/stress methodology on its own.
For practical workflows, see Guides: how to choose test durations, interpret instability, and compare benchmark scores responsibly.
Utility software that can push hardware to its limits deserves a transparent presentation. This site focuses on:
Why some people worry: FurMark can create a very heavy thermal load. That’s the point for stress testing, but it also means the software can feel “scary” if used recklessly. Our guidance explains safe durations, what to monitor, and when to stop.
Technical clarity builds trust. FurMark is primarily a GPU stress test and benchmark utility and typically does not require registry edits to run. If you use an installer build, Windows may add standard install/uninstall metadata (varies by version and distribution).
FurMark is not a driver updater, “PC cleaner,” or system optimizer. If a download claims those behaviors, treat it as suspicious and verify the source.
High-load utilities can trigger cautious warnings. Knowing what to check (and what “normal installer metadata” looks like) helps you decide safely.
These commands query typical Windows uninstall entries. Results vary by installer/version. If nothing appears, you may be using a portable build.
reg query "HKLM\SOFTWARE\Microsoft\Windows\CurrentVersion\Uninstall" /s /f "FurMark"
reg query "HKLM\SOFTWARE\WOW6432Node\Microsoft\Windows\CurrentVersion\Uninstall" /s /f "FurMark"
reg query "HKCU\SOFTWARE\Microsoft\Windows\CurrentVersion\Uninstall" /s /f "FurMark"Use PowerShell to quickly search uninstall keys for display names containing “FurMark.”
$paths = @(
  "HKLM:\Software\Microsoft\Windows\CurrentVersion\Uninstall\*",
  "HKLM:\Software\WOW6432Node\Microsoft\Windows\CurrentVersion\Uninstall\*",
  "HKCU:\Software\Microsoft\Windows\CurrentVersion\Uninstall\*"
)
Get-ItemProperty -Path $paths -ErrorAction SilentlyContinue |
  Where-Object { $_.DisplayName -match "FurMark" } |
Select-Object DisplayName, DisplayVersion, Publisher, InstallLocationWindows may attach a Zone Identifier (“Mark of the Web”) to files downloaded from the internet. That’s a normal OS behavior and not specific to FurMark. For a careful, non-dismissive approach to warnings, use Download → Antivirus false positives.
Use the download page for a safer flow: clear version context, integrity education, and “before you run” reminders for thermal load testing. If you’re troubleshooting a warning or launch issue, visit Guides first.
Download trust checklist